Welcome back to Paper Play, crafting friends!
I started this blog approximately 18 months ago to document my journey in AECP (Altenew Educator Certification Program). Over this time, I have taken 25 courses, created between 1-3 cards per course, and written 25 blog posts about what I've learned along the way. On Saturday, August 24, 2024, I hosted a live 2-hour workshop that I created based on what I learned through the program. I selected a topic, created two card designs to teach, wrote a lesson plan to submit for approval, marketed the workshop, and then hosted it. This final AECP blog post will take you through that process, including the workshop and lessons that I learned through it all.
Planning, Planning, Planning!
Once my work for 5 level three courses was reviewed and approved, Erum issued me my final assignment for the program - select a topic, create a lesson, and teach it in a live two-hour virtual workshop. I took some time to review all of the courses and started a list of possible topics. That list started out with eight topics and I started to whittle it down until it was down to two: one topic that was pretty safe and one that, while not directly a topic that was covered in the program, would take pieces of various courses and bring them together into a topic that truly interested me. I knew that the latter could be risky - but also knew that it could be very rewarding. I wanted to do something different than the workshops that I had attended and read about. I had made up my mind and decided on the second topic as my heart had to be in it for me to do well.
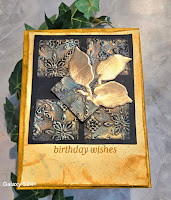
That topic was creating vintage tile greeting cards. I'm an old soul and have always been drawn towards vintage items. My favorite kind of creating is to take stamps, dies, and stencils and use them in a way that creates something that has a vintage flair. I knew that I could take several techniques learned through the program and apply them to the topic - water coloring with inks and ink sprays, adding small details that will create a big effect, using various shapes to build a card, and bringing what inspires me into my creative process. With this in mind, I created the cards that I would teach. I started by making one that was a general vintage style and then making one in an Art Deco style. These two cards had enough steps to take up a 2 hour time period. Here are the cards:


I next wrote up my lesson plan to send to Erum for approval. That lesson plan included the goal for the workshop, a list of products used, and the detailed steps to make each card. I checked, and rechecked, each step to ensure that someone could pick up the document and make each card by just following these directions. Once satisfied, I submitted it to Erum. I was so relieved when I heard back from her that it was approved.
Once I chose the date for the workshop, I worked on creating an advertisement for it to post in the Altenew Facebook groups, on my Facebook page, and on my Instagram page. Here is that advertisement:

I created it using Canva and was pretty happy with it since it was my first time using the program. I then posted it onto Facebook and Instagram hoping to have some interest in it. The goal was to have between 6 and 10 people sign up for the workshop and I was really happy to have 11 people sign up. I ended up having three cancellations as it got closer to the workshop date - two prior and one the day of due to losing her internet connection. That still left me with 8 crafting participants and my sister & niece also joined to watch me.
I also signed up for a Zoom subscription to allow me to host the workshop without interruption. I cannot stress enough how worthwhile it is to do this since it isn't very expensive for one month and provides a much better experience for your participants. I sent the zoom link to Erum and invited participants two days before the workshop to ensure that all received it.
In retrospect, all of this planning truly paid off. The workshop itself went smoothly due to it. I knew what order to teach the steps in and could refer to a printout as needed (and participants had it available as well), they knew what items to have available from the supply list, and there weren't any technology hiccups since the Zoom could go as long as I needed it to.
I'm including the supply list at the end of the post in an appendix to it.
The Workshop!
It was the day of the workshop before I knew it. I'd be lying to say that I wasn't nervous about it at all; however, I wasn't as anxious as I thought I'd be at the time. I knew that I was as prepared as I possibly could be and that made me feel better. I logged in to setup and was happy to see a couple of early birds logged in. Erum joined shortly thereafter, we made sure that everything was working properly and waited for the rest to join.
The first thing that amazed me was to hear how excited everyone was for the workshop. "I've been looking forward to this", "this is so different!", and "I've never done anything like this before" are a few of the comments that I heard. I started off by giving them some background on my interest in vintage and crafting, my inspiration for the tiles (old tin tile ceilings), and an overview of what we would accomplish.
Creating the tiles was such a fun experience. I went over the embossing folder that I was using to create my tiles (Dreamy Tiles 3D Geometric Embossing Folder), how to make tiles using a different embossing folder, and some examples of various coloring techniques. Here's a pic of the full tile set with various coloring mediums (ink sprays, pigment ink pads, acrylic paint, and gilding wax):

The attendees watched as I colored my tiles and started on their way to coloring their own. They asked lots of great questions about coloring mediums and techniques. We then went over adding either a turquoise/blue-green or rust patina to them. One by one they started to share their tiles and I was absolutely blown away! Their creativity was let loose, and they were all creating something different. There were multicolored panels of tiles in different shapes, wooden tiles, and tiles colored different than mine. At that moment, my heart got light, and I could not have felt more excited. I was so happy to see them taking what I was explaining and adapting it into their own unique ways. Creating the tiles takes up most of the time, which is why I started with that first.
We then moved on to discussing my cards designs and what I did to create the general vintage card. Everyone was focused on their creation and yet we talked, shared, and laughed with each other along the way. Once done with the first card, we moved on to the Art Deco style card. I again spoke about my inspiration (The Great Gastby by F. Scott Fitzgerald) and off to work we went. We ended up going over by about 15-20 minutes, but we did so with Erum's permission.
We ended with a quick wrap up of everyone sharing their cards. If I was blown away by seeing their tiles, I was left almost speechless by their amazing cards. They were absolutely gorgeous, and I couldn't have been more proud. I'm not someone who "toots their own horn." I seldom speak of successes and find receiving compliments to be somewhat awkward. However, the words shared with me as we wrapped up the workshop brought me so much joy: "This was amazing", "you showed me that it's okay to go outside the box", "you gave me permission to be free with my crafting and not constrained by traditional techniques." I was filled with so much joy as we said goodbye to each other.
Attendee Gallery:
Here are the amazing cards that were made in the workshop:


%201.jpg)


.png)
.png)
%202.jpg)


What did I learn?
I reflected on the workshop for a couple of days before I started to write some thoughts down. I needed that time because I was honestly so elated by the experience. Here are some of the lessons that I learned throughout the AECP program and from the workshop.
- Take Risks: this is the most important lesson that I learned through it all - and especially from my workshop. Don't do something easy or safe. Do something that will stretch your limits and possibly even put you out of your comfort zone. That's where the real reward and payoff exists. I never really saw too many vintage style cards in online pics in Altenew groups. I could have easily decided not to go with this topic because of that. However, I don't believe that the experience would have been so special to me if I did.
- Plan, Plan, Plan: I cannot stress enough how important this is. I was given this advice by another Certified Educator and it was the best advice that I received. Create a detailed lesson plan. Create an example card made by following it. Do prep work in advance of the workshop to give you the time to answer questions and not fall behind yourself during the workshop. Subscribe to Zoom for one month to make the technology experience as flawless as possible. Practice your camera views the night before your workshop. All of this will assist you with being prepared and make it less stressful.
- Use the Program to Find Your Style and Develop It: Vintage is not the only style of card or craft that I create. I also enjoy clean and simple cards, florals, scenes, etc. I like to tell stories in my cards. Some people write stories and I like to tell them visually. Those are all part of my style as well. The techniques that you learn via the AECP program courses allow you to add those techniques to your tool bag and use them to enhance your style. I created several vintage style cards for my courses. I was so encouraged by Erum's feedback about it, embraced it, and ran with it. All of that culminated in me deciding on my workshop topic and developing the lesson plan to support it. I took the time to discover it and enhance it as I worked through the program, and I feel that it allowed me to hold a successful workshop.
- There is Much for Us to Learn from Each Other: I cannot stress this enough - take the time to get to know those on the journey with you and those in your workshop. There is so much to be learned from everyone. That is what amazed me about my workshop - I learned so much from others and their creations. I don't see the program as a competition but rather an opportunity to learn from so many other talented crafters. We all have something to contribute and something to learn. Make every effort to do so!
- Simple is Better: Keep it simple because two hours fly by very quickly! Everyone ooh's and ahh's over complicated designs. However, they usually take longer to create. The goal of the workshop is to offer a taster course on your topic - not a PHD level one! I heard from others not to get too complicated, and I can't echo this enough. You will be less likely to get tripped up by something, which should make the experience less stressful for you.
Overall, I felt that the workshop went very well. Everyone seemed engaged and happy to be there. I heard from a few attendees that they learned some new tools and tips to use in their creations. I think the best feedback that I heard was that the workshop allowed them to feel free to "color outside the lines" and take chances they normally wouldn't take in their crafting. That truly made me happy to hear.
The AECP experience was an amazing one for me. I thoroughly enjoyed the classes, especially in level three when I was able to choose them. (As a side note on that, I consider Creative Coloring with Erum and Runway Inspired Card Making to be the best two courses available. Seriously - you should check them out!) Erum was great in running the program and always provided helpful feedback on my project submissions. She was also extremely helpful in preparing for the workshop. I can't thank her enough. I also want to thank Tamara Eastridge and Anet Van Zyl who were part of my AECP group. They offered so much support along the journey. I may have never met them if not for this program and I'm grateful to have made the journey with them. I also want to thank Linda Fields. She has been an inspiration and mentor to me through this. I am better for knowing all of them.
Appendix - Supply List
These are the supplies that I used. However, I offer suggestions on how they may create tiles from a non-floral embossing folder. I will also offer suggestions for alternatives to what I used to help keep the cost of supplies low.
- · Altenew Dreamy Tiles Geometric 3D Embossing Folder (any patterned, non-floral folder will work)
- · Altenew Craft a Flower: Antique Rose (I only use the leaf from this; any die set with a set of leaves will work)
- · Altenew Streamlined Sprig Die Set (Again, can make any die set with a set of leaves work)
- · Altenew Deco Greetings (You may use whatever sentiment stamps you like though)
- · Altenew Ink Spray: Caramel Toffee Metallic Shimmer, Antique Gold Metallic. Optional ones include White, Black, Antique Silver, and Iridescent. (Note that ink cubes/pads may be substituted for the sprays; gilding wax may also be used in lieu of inks.)
- · Altenew Crisp Dye Inks: Fall Harvest Set (Butternut, Pumpkin Pie, Yellow Ochre, Sicilian Amber), Turquoise (Tim Holtz Distress Inks will also work: Antique Linen, Tea Stain, Vintage Photo, and Broken China)
- · Ocean Waves Altenew Artist Marker or any turquoise alcohol marker
- · Gold pigment ink pad
- · Glossy Accents (optional)
- · 1 A2 Kraft Card Base
- · 1 A2 Black Card Base
- · 1 4”x5.25” cream card panel (white may be substituted)
- · 1 4”x5.25” white card panel
- · 1 piece of black card stock cut to 5.5”x5.5”
- · Altenew Brushed Copper Card Stock (any brushed metal card stock may be substituted)
- · Jewels/sequins (optional)
- · Clear Gesso (optional)
- · Plastic knife or distressing tool (optional)

Excellent excellent job. I thoroughly enjoyed it and this post is chock full of great suggestions and feedback.
ReplyDeleteThanks so much, Pam! I appreciate you attending and supporting me!
DeleteI am sorry I couldn't attempt, and to see I really missed a very good workshop! The cards are all so gorgeous and your blog is very informative! Great job Walter!
ReplyDeleteThanks very much! I will be hosting the class again in the coming month.
DeleteCongratulations! Sounds like a big success! Thanks for posting all this as it’ll help me when I finally reach level 3.
ReplyDeleteThank you! Good luck with your level 3 courses and getting ready for a workshop!
DeleteWow Walter, what a great workshop and informative blog post! I knew I would miss something while being out of the country. Congratulations! (Claudia C.)
ReplyDeleteCongratulations Walter on your amazing class and great techniques! This is one I will add to my list of ever growing things to try! Way to SHINE my friend!
ReplyDeleteThanks so much, Kelly! I had such a great time with it. I appreciate your kind words and encouragement!
DeleteWow! These are all amazing!! Fantastic technique!
ReplyDeleteThanks very much, Debbie!
DeleteThis was so fun to attend and everyone's cards turned out so great! Thank you Walter for letting me join this awesome class of yours!
ReplyDeleteThanks so much, my friend! It made me happy to have your friendly face in the class. I truly appreciate all of your kindness and support!
Delete