Happy December, friends!
Thanks for stopping by Paper Play to see what's new. It's hard to believe that the month is already half-way over and that Christmas is less than two weeks away. I've been busy crafting design team monthly projects, gifts for friends and family, and Christmas cards. Speaking of which . . . today I'm sharing my creations for the Gecko Galz design team.
First up is one of two tags that I created for our 25 Tags of Christmas event on the Gecko Galz blog. Comfort
and Joy was made by: shrinking a digital stamp from the Christmas
Traditions set of digital stamps, coloring it, adding some grit paste,
adding some grunge with Antique Linen Distress Spray Stain, framing it
with these beautiful gold frames and a sentiment from the Compliments of
the Season kit, and adding some ribbon. I fell in love with this digital stamp as soon as I saw it. It looks like an idyllic Christmas morning to me.
My second tag will be shared on December 22nd . . . stay tuned!
The next shares are all my creations for the December challenge. The theme for the month was Winter Elegance. My interpretation of the theme was focused on finding that elegance in everyday life. I showcased the products used with bits of sparkle and glitz to add the elegance.
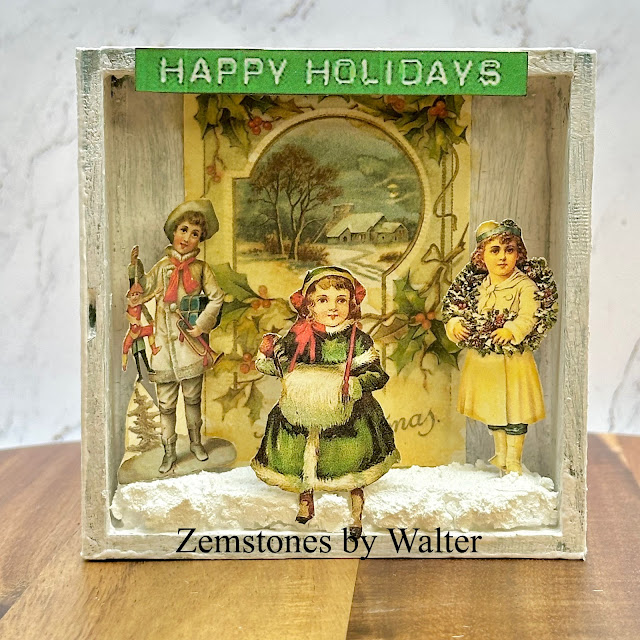
This beautiful Victorian winter shadow box was made with two different Gecko Galz collections. The background picture is from Merry Little Christmas and the rest of the items are from Christmas Spirit. I started by painting the square wood shadow box with some Patina colored chalk paint, applied a coat of crackle medium, and then applied Oatmeal colored chalk paint over it. This process achieved a crackle look that made it look like it was older and had been painted over a few times. Once dry, I glued the background image inside of the box. I then applied grit paste the a piece of styrofoam and glued it to the inside bottom of the box. I fussy cut the images, glued stick pins to the back of them, and stuck them in place inside of the shadow box. The sentiment was attached to the top with some double sided foam tape. I sent this as a gift to my dear friend Kathy and I'm happy to say that she loved it!


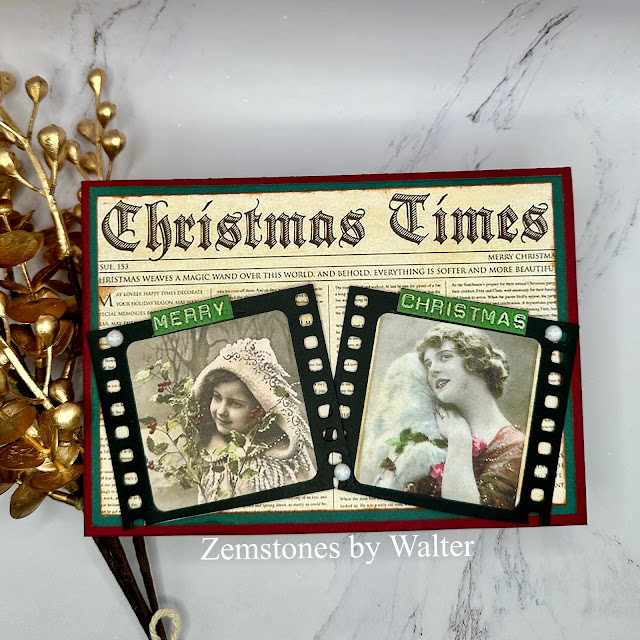
My two Christmas cards were made with images and paper from Christmas Spirit and Compliments of the Season. I love these images so much and wanted to showcase them in a beautiful way. I aged the photos and background papers by distressing the edges with a plastic knife and then running some Tea Dye Distress Ink around the edges. I also applied some of the ink to the paper for some added grunge. The result is vintage Christmas cards that will bring a smile to anyone.

Last, but certainly not least, are my vintage Christmas ornaments made with images from Christmas Spirit. They are SO easy to make and (now, I may be a little biased!) beautifully elegant. The hardest part of making them is cutting the hole in the front of the ornament. The ones that I used were made of a thicker plastic so I used by Dremel tool and the circular cutting blade to cut the shape. It takes a little bit of a steady hand, but the blade glides through it like butter. It may take a couple of passes to get the shape as you like it. I then used the sanding attachment and sanded down the sharp edges. Note that you may use an exacto knife if you don't have a Dremel tool, but it may take a little longer and require more pressure if the plastic is on the thicker side. It's all smooth sailing once the holes are cut! I painted a base coat of chalk paint on each (Patina on two, Frost Blue on the other), let it dry, and then applied a coat of crackle medium. Next, I added some extra fine white glitter to my top coat color, mixed it up, and painted it on. I did also paint the inside of each ornament with a couple of coats of this glitter paint. I used super glue to attach a small piece of styrofoam to the inside bottom of the ornament. Once dry, I glued one of the images to that piece of styrofoam to keep them in place. I had previously made outside decorative pieces with some moldable foam clay and moulds. I painted them and attached to the ornaments with glue. Grit paste was added around the hole to give it a little extra snow effect and dimension. Here's a tip for you - the grit paste can also hide any imperfections made from cutting the hole! Made an oopsie? Cover it with grit paste or glitter glue! Let's keep that secret between us, okay?! The last step was to apply some gems (pearls and silver balls) to the ornaments.


I hope that you enjoyed reading about my inaugural projects as a member of the Gecko Glaz design team. Let me know in the comments if you have any questions about the steps outlined above - I'll be sure to answer them for you!
I wish you and your loved ones the merriest of holidays and my heartfelt best for 2024! Until next time . . . be well!


